▂▃▅▇█▓▒░ [Rhino Build] ░▒▓█▇▅▃▂
I started the modelling process by initially making the Pac-man and Ghosts pixel art in Rhino as 2D objects to make them look exactly like my initial sketch without the eyes and colour.
 |
| Pac-man Pixel Art in Rhino |
 |
| Initial Sketch |
I then trimmed the squares to only be left with the outer line. Next, I used the surface and extrude commands to make the shapes 3D. After I extruded the whole shape, I cut the 3D object with a smaller version of the extrusion so I could only have the outer form of the Pac-man and Ghosts. I did this as I only required the perimeter of the shape of the Pac-man and Ghosts to stick onto the sides of the cube. |
| A top view of the outline and cutting shape |
 |
| A 3D view of the outline and cutting shape |
|
After I got the 3D outlines for the Pac-man and Ghosts, I proceeded to put them on the cube. In order to make sure I had the exact size I wanted for the cube to put the shapes on, I put a square around the 3D shapes to get the desired size. I then put the Pac-man and Ghosts shapes on the side of the cube faces and the corner so I could compare them to decide which one I preferred.
 |
| Render View of the Shapes on the Cube Sides |
 |
| Render View of the shapes on the corners of the cube. |
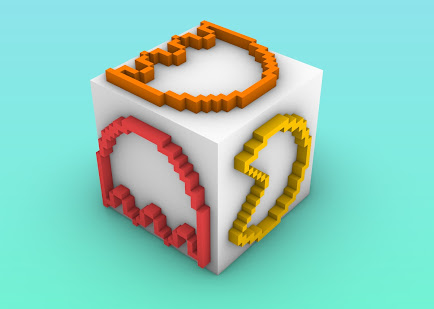
In the renders, I had the outlines of the characters in 3D on the outside of the cube. This could be possible to do with physical paper but that would be quite tricky and would probably require multiple attempts to get right.
 |
| A Render of the Pac-man Cube |
▂▃▅▇█▓▒░ [Laser Cutting] ░▒▓█▇▅▃▂
After presenting my renders to the class, I remember that one of the students mentioned how putting the Pac-man characters on the corners of the cube was a unique idea and that it would make this project more interesting. So I took their advice in mind when it came to laser cutting. For the model to be cut with the laser cutter, I made a cube which I unfolded using the "Rotate 3D" command, I then moved the Pac-man and ghosts onto the cube faces, and switched the curves to a different layer. This way the laser cutter would cut out the Pac-man and Ghosts shapes into the cube.
So my plan for assembling this project was to put the coloured paper inside the cube to hold the shape together. The paper I chose to get cut for the cube was a rather thick kind of arches paper. I couldn't decide on the size of the cutouts of the Pac-man characters so I made 2 different sizes. I used paper for this project as I had prior experience with the papercraft project from OBDF 110.
▂▃▅▇█▓▒░ [Build Process] ░▒▓█▇▅▃▂
In order to get the paper to the right side to fit in the corner, I measured the inside of the cube, cut the paper into the right size and taped it to the inside.
 |
| The Colours I used for the inside |
 |
| Process of attaching the yellow paper |
 |
| The inside of the cube with all the colours |
▂▃▅▇█▓▒░ [Finished Project] ░▒▓█▇▅▃▂
 |
The Pac-man Cube with Large Outlines
|
 |
The Pac-man Cube with small outlines
Overall I think this project turned out really well. I personally prefer the cube with the large outlines of the Pac-man characters. The large outlines have a larger area of colour on the overall cube which I think looks great. I had initially planned to make an engraving of Pac-man pixel art on a piece of wood. But I'm glad that I decided to make it a cube instead. The finished project does have some imperfections but because of the material, I think it was unavoidable. The entire process of this project was quite fun. The modelling in Rhino, laser cutting the project, and assembling the project were all fun.
|


Comments
Post a Comment